Ever wished you could grow fresh herbs, leafy greens, or even tomatoes right in your apartment—without messy soil or a big backyard? Welcome to the world of hydroponic gardening DIY. At first, I thought hydroponics was only for techy gardeners with fancy setups. But once I built my first simple system out of a plastic tote and some tubing, I realized it was way easier (and cheaper) than I imagined.
The best part? Plants grow faster, you control everything they eat, and you don’t have to wrestle with weeds or pests. If you’re curious about turning your kitchen corner, balcony, or garage into a mini indoor farm, stick with me. We’ll cover everything you need to know to start your own DIY hydroponic garden—from system basics to setup tips and common mistakes to avoid.
What is Hydroponic Gardening?
In a nutshell, hydroponics is growing plants without soil. Instead, roots sit in a nutrient-rich water solution that provides all the minerals and oxygen they need.
Why Hydroponics Rocks
- Faster growth: Plants absorb nutrients directly, so no waiting around.
- Space-saving: Perfect for apartments or small homes.
- Water-efficient: Uses up to 90% less water than soil gardening.
- Clean and neat: No dirt, no weeds, no mess.
It might sound futuristic, but with the right tools and a little DIY spirit, you can set up a system at home for less than the price of a weekly grocery haul.
Different Types of Hydroponic Systems
Before we dive into the DIY build, let’s break down the most common hydroponic setups.
1. Deep Water Culture (DWC)
Plants float on a nutrient solution in net pots, and roots dangle directly in water. Super simple and great for beginners.
2. Nutrient Film Technique (NFT)
A thin film of water flows past plant roots in a sloped channel. Efficient but needs a pump running constantly.
3. Wick System
Passive setup where a wick pulls nutrients to the roots. Low-maintenance but best for small plants.
4. Ebb and Flow (Flood and Drain)
Water floods the plant tray and then drains away. Excellent for bigger plants but requires more parts.
5. Aeroponics
Roots hang in the air and are misted with nutrients. High-tech, efficient, but harder to DIY.
👉 IMO, if you’re just starting, go with Deep Water Culture. It’s cheap, easy, and very beginner-friendly.
DIY Hydroponic Gardening: What You’ll Need
Here’s a quick shopping list for a basic DWC setup:
- 5–10 gallon plastic tote (dark-colored to block light)
- Net pots (to hold plants)
- Hydroponic grow medium (clay pebbles, perlite, or rockwool)
- Air pump + air stone (to oxygenate the water)
- Hydroponic nutrients (liquid or powder form)
- pH test kit and pH adjusters
- LED grow lights (if you’re indoors)
- Drill or hole saw (to cut pot holes in the lid)
Most of this stuff is available at garden centers or online.
Step-by-Step DIY Setup
Step 1: Prepare Your Container
Grab a sturdy plastic tote or bucket. Drill holes in the lid for your net pots. Each hole should be wide enough to fit a pot snugly.
Step 2: Add Air Pump and Stone
Place the air stone at the bottom of your tote and connect it to the air pump. This keeps the water oxygenated so roots don’t suffocate.
Step 3: Mix Nutrient Solution
Fill the tote with water and add hydroponic nutrients according to the instructions. Use your pH kit to adjust water between 5.5–6.5, the sweet spot for most plants.
Step 4: Insert Plants
Place seedlings in net pots filled with clay pebbles or rockwool. Lower them into the holes so roots dangle into the water.
Step 5: Light It Up
If you’re indoors, set up LED grow lights above your system. Keep them about 12–18 inches above plants and adjust as they grow.
Boom—you’ve got your very own DIY hydroponic garden!
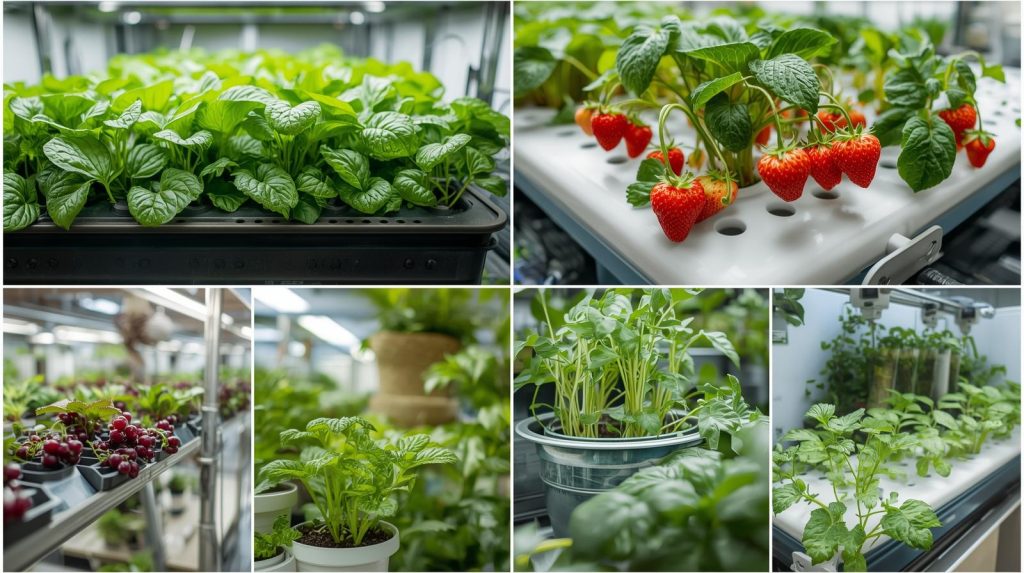
Best Plants for Hydroponic Gardening DIY
Not every plant is ideal for hydroponics, especially big root crops. Here are some winners:
- Leafy greens: Lettuce, spinach, kale
- Herbs: Basil, mint, cilantro, parsley
- Fruit crops: Tomatoes, peppers, strawberries
- Fast growers: Bok choy, arugula, green onions
FYI: Start with leafy greens—they’re forgiving and grow quickly, giving you fast results.
Tips for Hydroponic Gardening Success
Keep Water Clean
Change your nutrient solution every 2 weeks to prevent buildup and algae.
Monitor pH and EC
- pH should stay between 5.5–6.5.
- EC (electrical conductivity) measures nutrient strength—too high, and roots burn.
Watch Temperature
- Water temp: 65–75°F (18–24°C)
- Air temp: 70–80°F (21–26°C)
Light Cycles
- Leafy greens: 14–16 hours of light daily.
- Fruiting plants: 12–14 hours.
Common Mistakes to Avoid
Even the best gardeners trip up sometimes. Here’s what to steer clear of:
- Overfeeding nutrients: More isn’t better—too much can damage roots.
- Ignoring pH: Plants won’t absorb nutrients properly if pH is off.
- Poor aeration: Roots drown without enough oxygen.
- Using tap water: Chlorine and hard minerals can throw things off. Use filtered water if possible.
My Hydroponics Journey
I’ll admit it: when I first heard of hydroponics, I pictured expensive greenhouses with pipes and glowing lights. But when I finally tried hydroponic gardening DIY, I realized it could be as simple as a tote, an air pump, and a few herbs. The first time I harvested crisp lettuce in just a few weeks, I was hooked.
Now, I’ve got a mix of leafy greens growing indoors year-round. No weeds, no mud, and no pests munching on my plants. It’s like having a salad bar in my living room—and my friends love coming over to “shop” from my hydro garden .
Conclusion
So, there you have it—your ultimate guide to hydroponic gardening DIY. It’s not just for pros or tech geeks; anyone with a little curiosity and a plastic tote can grow fresh food indoors.